
Japanese Cheesecake - 3 Ingredients by watereverysunday (Copyright)
Hi everyone! Full Spring is blown except for seasonal pollen. Sorry allergy sufferers, including myself. Achoo!! Regardless, the weather is perfect, nice breezes and the streets are filled with blooming flowers everywhere you walk.
That said, let's bake something light and fluffy. It is Spring after all. I was at a Korean bakery the other day and picked up a mini Japanese cheesecake that I enjoyed a lot. This made me think of this recipe blog that was sitting in my blog drafts for some time. So, it seems that now is a perfect time to finish it up!
Japanese cheesecake is much lighter and more chiffon and french soufflé-like version which is different from a heavier American cheesecake and with the graham cracker bottom. Both are so delicious but if you've never tried Japanese Cheesecake, here is the chance to bake a new cake and eat it, too!
A brief history of Japanese Cheesecake from Wikipedia.
The recipe was created by Japanese chef Tomotaro Kuzuno, who was inspired by a local German käsekuchen cheesecake during a trip to Berlin in the 1960s. It is less sweet and has fewer calories than standard Western style cheesecakes, containing less cheese and sugar. The cake is made with cream cheese, butter, sugar and eggs. Similar to chiffon cake or soufflé, Japanese cheesecake has a fluffy texture produced by whipping egg white and egg yolk separately. It is traditionally made in a water bath or double boiler. It is also a signature dish of Uncle Tetsu in Japan.

Image Source: Uncle Tetsu's Cheesecake
You could go with a more traditional approach with more classic ingredients but I am a lazy baker and will do anything to get things done by a fail proof and no brainer method. That said, only 3 ingredients used, with a few options for your taste preference.
That said, cut the noises and let's bake!
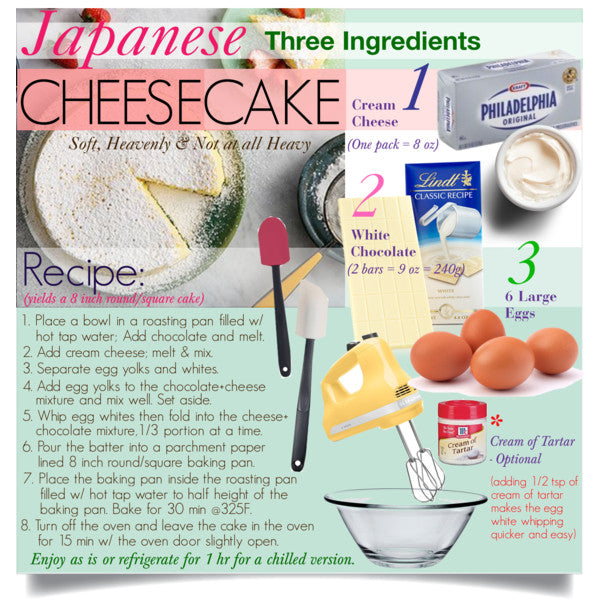
Three Ingredients JAPANESE CHEESECAKE
Recipe Yields 8 or 9 Inch Pan Size Cake
INGREDIENTS:
- Block Cheesecake (not the whipped one) - 1 Pack, 8 Oz
- White Chocolate - 2 Bars or Baking Chips, 9 Oz
- 6 Large Eggs
- Cream or Tartar, Vanilla Extract, Lemon Zest (Optional)*
- Fresh Strawberries, berries, kiwi and mandarine orange, my faves. (Optional)*
BAKING TOOLS:
- Large Square Roasting Pan to contain cake baking pan
- 8 or 9 Inch Round or Square Baking Pan
- Electric mixer or hand whisker
- Silicone Spatular
- Parchment paper or baking spray
HOW TO:
3 Ingredients Japanese cheesecake
The key point that makes this recipe instantly simpler with 3 ingredients and a kind of cheatsheet for the original recipe is that this recipe uses white chocolate instead of traditional milk, sugar, butter etc. White chocolate already has milk, sugar and cocoa butter but less sweeter than traditional recipes with more sugar.
I read some posts about the same recipe online that warned of failing a couple of times before succeeding. I guess that I've baked other chiffon cakes in the past and that made me an 1st time achiever with this recipe and called it quick and easy. That said, I recommend you read it first, study a bit and plan ahead instead of winging it, wishing somehow you will get lucky.
- Place a bowl in a roasting pan filled with hot tap water (not scorching hot). Add white chocolate to the bowl and melt. If needed, top the water bath with hotter water to increase the temperature of the water bath. You can also do this over the hot water bath on a stove if you know how to do this. Softening is the key as you are melting, not cooking the chocolate.
- Cut the cream cheese into small pieces. I suggest you just unfold the foil packaging and cut on it and leave them at room temperature to soften before adding to the chocolate bowl. Or you can microwave the cream cheese for 8 seconds intervals to soften as per the packaging instructions (without the foil of course). Add to the melted chocolate bowl, mix until homogeneous and smooth over the warm to hot water bath, or off the water bath if the mixture is warm enough to mix. Set Aside and cool to room temperature before adding the egg yolks as you do not want to cook the eggs.
- Separate egg yolks and whites. Leave them at room temperature. Egg whites whip better at room temperature than cold.
- Add egg yolks to the white chocolate and cream cheese mixture and mix well. This is the step when you can add vanilla extract, lemon zest, etc. Set aside and cool to room temperature.
- Whip the egg whites (to peaks until no liquid left at the bottom). Add a teaspoon of cream of tartar If your egg whites are not whipping to the meringue like peaks. This makes the whipping process a fool proof success. Add the whipped egg whites into the room temperature egg yolk+cheese mixture, 1/3 portion at a time and gently fold using a silicone spatula. Never stir and mix the batter to a liquid-y mixture. You are inserting the whipped air into the batter so that it will make your cake fluffy and soufflé airy. Also if your cream cheese and chocolate mixture is too warm, it will turn the air whipped egg whites into a liquid so make sure your batters are cool enough.
- Pour the batter into a parchment paper lined round/square baking pan of your choice. Unless you are aiming for esthetics of the results, just use 8 - 9 inches round or square baking pans you have and experiment the recipe several times with different size pans. The difference between 8 or 9 inches and round or square are about a cup measurement in volume due to the shape difference. Gently tap the baking pan to evenly spread the batter in the pan. However, do not over tap the baking pan. By doing so you might lose the whipped air you've just folded in. It will level by its own while baking in the oven anyways.
- Place the baking pan inside of the roasting pan, add hot tap water to half height of the baking pan (less or higher water level will alter the baking temperature, time and result - less will result in more cakey, more water will be custardy) in a preheated oven and bake for 30 minutes at 325°F (163 °C).
- Turn off the oven and leave the cake in the oven for 15 minutes with the oven door slightly open, ajar not wide open. This makes the cake stop baking but cool down gentler and less drying using the residual heat and steam from the water bath inside the oven.
- Take out the cake and cool down completely before serving. The hot cake just out of the oven is fragile and sticky when cutting and will smell and taste eggy. Cooling further in the refrigerator could bring out the cheese and other flavor to its best. Also note that the cooled cake will shrink down and set just like the traditional cheesecake. Now you enjoy as it is!
- or top and garnish with your favorite fruits. I love to top my Japanese cheesecake with mandarin oranges from the can after draining the juice off and mixing with orange marmalades jam.
HOPE YOU ENHOY THIS RECIPE! NOW ENJOY WHILE IT LASTS!!
Comment if you have tried this recipe and how it turned out!